Introduction > Rifle > Equipment > Ammunition > Shooting > Cleaning > Bedding
Shooting
Having established yourself on the firing point with your loading table and kit set out ready, the time has come to fit the sling and blacken the sights. The sling should be attached to the original sling swivels and, ideally, will consist of one of those broad canvas affairs with leather tabs secured by brass buttons. Single point slings or those involving altering the rifle in any way are not permitted under the “Spirit of the Original Rules”.
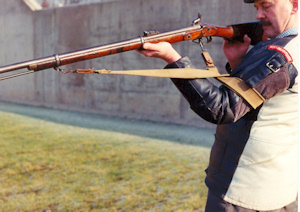
There are two methods of using the sling without breeching the “Rules”. The conventional way is for the sling to pass round the back of the upper arm and from thence to the right side of the left wrist (right handedness presumed), then under the back of the left hand to the forward sling swivel. This is the system most commonly used but there is another one which is superior in the eyes of very experienced shooters. With this method, known as the Two Point Cross Over, the sling is lengthened by an amount which will allow it to pass from the rear sling swivel to the FRONT of the left upper arm, then round the arm in a complete loop crossing over ABOVE itself before going, as before, to the left wrist. It should be tried and fitted at home to ensure that the length is adjusted correctly. This gives greater stability and is proven in practice.
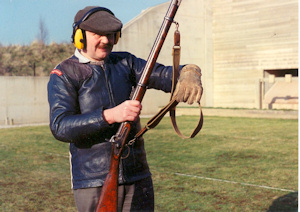
Sight blackening should be applied to the foresight and to those parts of the rear sight likely to reflect light. The deadest and most intense black of all comes from the carbide lamp with its sooty acetylene flame. Although this is more complicated than the spray can or brush, it has the advantage of not running out or drying out as all that is needed is carbide and water.
Before loading the rifle, two or three caps should be snapped with the muzzle pointing (in a safe direction) at a piece of grass which will react to the puff of air from the muzzle showing that the communication is clear of oil. The experienced ear will also be able to distinguish the difference in sound between a blocked and unblocked communication.
The practice of “blowing off” a small blank charge to check if the communication is clear is not to be encouraged. This fouls the barrel and subsequent shots will not necessarily clean out the fouling which will continue to accumulate until a stoppage occurs.
Select a suitable grade and charge of powder, from 60 to 70 grains of TPPH is recommended, but this must depend on the availability of a suitable selection of powders. Do not use anything coarser than TPPH. The use of scales is recommended for precision but if a flask is being used, this should be set for the desired amount by “throwing” charges and weighing them until the right setting is achieved. A flask should always be used in exactly the same way. The writer inverts it, shakes it three times and then taps the head of the flask three times against the wood of the table before releasing the shutter. Experience has shown that an accuracy of half a grain can be maintained this way. Tapped four times the charge will show an increase of two or three grains, so it can be seen how essential is regularity.
The first powder charge should now be loaded by way of the small funnel inserted into the muzzle. Keep the barrel as vertical as possible to allow the powder to drop straight down. Then insert into the muzzle one of your greased bullets. No wadding or any other material needs to be inserted between the powder and the bullet. Using your cleaning rod with its ramming tip, if you have one, or a length of plain half inch wooden doweling, ram down the bullet onto the powder finishing with two light taps on the bullet nose. This procedure was recommended in antiquity and seems to work perfectly. The light blows ensure that the bullet is seated firmly on the powder without either damaging the bullet’s nose or crushing the powder. It also serves to very slightly upset the bullet so that it remains firmly in place and is very unlikely to move forward if the rifle is pointed downwards when loaded, although this should always be avoided.
Always fire at least one and ideally two or three warming or fouling shots before commencing a competition. International rules stipulate one only but MLAGB allow unlimited warmers provided they are not directed at the target. Sometimes the first one will have a slight but noticeable delay or “hang fire” if there is some oil remaining in the communication. If the rifle fails to fire with the first cap, keep it firmly in position, wait a few moments and try a new cap. If this fails, put a few grains of powder into the opening in the top of the nipple and try again. This usually works. If it does not, there are two possibilities. The first is quite simply forgetting to have put any powder in. The remedy for this will be discussed later. Assuming that powder has indeed been loaded, there is clearly too much muck in the nipple bolster and, still keeping the rifle pointed in a safe direction, turn out the nipple and put a small quantity of fine powder into the bottom of the bolster and return the nipple. If there is powder in the chamber it will surely fire. Before loading again it will be worth checking to see if there was some obstruction down in the bottom of the breech. To do this, take the double pronged worm, screw it to the end of your cleaning rod and scour the face of the breech. There might have been a piece of cleaning material there and, if there was, it could now be a smouldering trap waiting for a nice new charge of powder to be fed to it. Hands and eyes have been lost like this.
There is another method for clearing a jammed barrel but the equipment is not often seen. This is by compressed air or by the use of a CO2 cartridge with a suitable adapter. The writer has used both and they are highly effective.
However, it is highly unlikely that the unfortunate circumstances detailed above will happen so blow away that warming shot, get up and, half cocking your rifle, remove the fired cap. Then reload the rifle and note that the loading rod should take the bullet down to the charge with exactly the same level of smoothness that you experienced with the clean bore. Do not lower the cock onto the nipple as the free passage of air will allow the bullet do go down freely and it will also help to drive the powder right up to the base of the nipple. There is no danger of powder leaking from the nipple provided the hole is as small as it should be. If during the course of a shoot you find that loading is becoming difficult because the bullet is tending to stick in the bore, something is not right. The last shot should load as easily as the first. However, if that is happening, as soon as the shot has been fired, give the bore a good brushing out with the phosphor bronze brush on your cleaning rod. A smaller load, softer grease, or a change of powder are indicated. Ignoring the problem will probably result in a bullet stuck half way down and this can be very difficult to move. On no account try to move it by shooting it out unless the bullet is right down on the powder. The barrel will burst, or at the very least be badly bulged.